I put the rest of the post under the fold as most of you probably don't care...
I've been asked a few times to show how to calibrate the scale if it's not included in the image metadata. Probably about time I make some sort of reference post...
So what you need first is some sort of micrometer slide (microscope slide with a scale on it). Usually they come as a mm long thing that's divided 10x into 100um units, which are in turn subdivided again into 10um ones. So go ahead and dig one out of some dusty drawer in the corner of the microscopy room. If your lab is really disorganised/poor/prone to breaking stuff, a local core imaging facility should have one somewhere. I hear they usually accept bribes, such as chocolate. Be nice to them. Here a micrometer slide at 4x:
Place the slide on the stage, and focus on it. Make sure you've got the entire field of view selected in the imaging software; sometimes you could be imaging only a small section (to reduce exposure time, for example), and some software could actually mess up your image pixel density (even though it shouldn't) when you have less than the total area selected. So if for whatever odd reason you find yourself imaging a 500 x 500 pixel region instead of 2576 x 1924 or whatever your standard field of view is, be sure to have some images of the micrometer under those conditions as well. It probably shouldn't cause a problem, but I've been told horror stories. And of course you have to take pictures of the scale bar specifically for each objective, even if you have two of the same mag. When imaging stuff later, be sure to keep track of specifically which objective was used. And, of course, try to get the best image you can.
So now you've got your calibration images. And let's assume you've got ImageJ up and running already. Let's walk through an example for our 40x air objective. Select the line tool, and carefully measure from start of one major line to the start of the next, or end to end. If you have 2 major (100um) divisions in one field of view, to help reduce error you can measure the 200um distance instead. Record the length in pixels; in this example, 2364/200um.
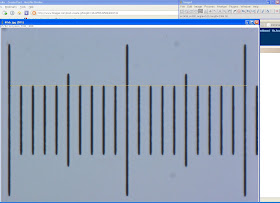
Now we know that under given conditions, the 40x scale is 2364pixels/200um, or 11.82pixels/um. Feel free to drop the 0.02, as our accuracy is nowhere near the hundreths of a pixel. In fact, the true scale is probably anywhere from 11.7-11.9, but, being biologists, we usually don't care about such precision anyway. Record this somewhere reliable, and preferrably accessible to your labmates (as much fun as it could be to watch them go through the ordeal all on their own, you'd probably want to present yourself as the nice guy/gal; that way, you'd be able to ask them 'kindly' to do things for you later on). Get the measurements for each of the objectives.
Now go to Analyze>Set Scale...
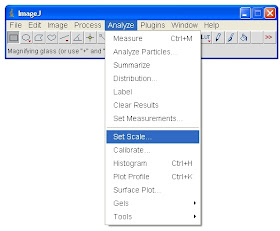
Which should bring up a menu. Enter the conversion ratio and specify units. If you're too lazy to divide your pixel/micron result, you can actually enter them here directly:
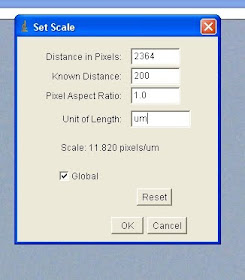
Check 'Global' if you want this scale to apply to all images in the current ImageJ session. Note, if IJ crashes or you restart the program for any other reason, you have to re-enter the scale each time. Should take a total of 2 seconds if you have all your ratios written down somewhere convenient (or memorised) though.
Click 'OK', and watch the magic happen: (also, test things out to make sure it shows ~100um between the 100um divisions)
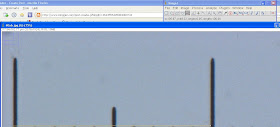
To make a measurement, just hit ctrl+m or simply m on your keyboard. Go to Analyze>Set Measurements... to pick out which measurements you'd like to be recorded.
Making a scalebar
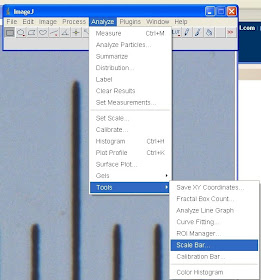
Now that we have the image scale all set up, we often need to include a scalebar somewhere in the image. IJ makes this process incredibly simple. S'pose for some rather surreal reason, we'd like a scalebar on our micrometer image. Select image window. Go to Analyze>Tools>Scale Bar
Now you can specify the width, height (thickness of the scalebar), font size, colour, whether you'd like there to be a box of a certain background colour behind the bar, where you'd like it in the image, and various text options (including whether you even want text in the first place)
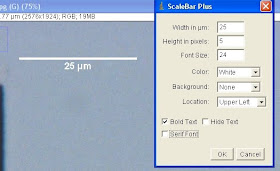
OK that, and now you've got a scalebar. I've added mine to the keyboard shortcuts, so all I need to do to get one is hit 'b', check the width and location, and 'enter', and...done! Very convenient, especially once you've memorised the pixel/um ratios for your most frequently used objectives.
Was this post helpful at all? It's my first time making a tutorial like this, so please do let me know if anything is unclear/if I've failed miserably somewhere. Also, if anyone has any issues with ImageJ they'd like cleared up, feel free to share in the comments, and I *might* be able to say something useful. No guarantees though ^_^


Sometimes it might be useful to have an anisotropic scale - any idea whether there is a plugin that allows for a two sided (L-type) scale bar?
ReplyDeleteHi, I find this post useful.
ReplyDeleteI am just learning to use image j. I have some images already and want to have my measurements in micrometer but imagej displays in pixel. Can you explain how to convert. Thanks
hi,
DeleteI found it very useful.thanks lot
hi, this is a very good post!
ReplyDelete